Embedded Workflow#
On this page, we provide documentation of workflows to deploy acados on different embedded systems, as well as methods for adapting Simulink models for deployment.
We want to encourage you to contribute a description of the workflow to deploy acados on an embedded system that is not yet mentioned on this page by creating a pull request.
Additional information for some platforms not listed here can be found on the acados forum.
dSPACE platforms#
Here we present the workflow for cross-compilation of acados for several dSPACE platforms:
DS1202 (MicroLabBox I)
DS1401 (MicroAutoBox II)
DS1403 (MicroAutoBox III)
NOTE: In the following DSXXXX should be replaced with the ID for your specific platform (see above).
Prerequisites#
You were able to install
acadosand dSPACE on your system.You were able to generate S-Functions with
acados, which also work in your Simulink simulation<Simulation_Model_Name>.slx. Thus, you have a folderc_generated_codewith your S-Functions, amake_sfun.mMATLAB script (and amake_sfun_sim.mscript, if needed) and the corresponding C files.You have prepared a Simulink model with the name
<dSPACE_Model_Name>.slx, which does not contain theacadosS-Functions yet, and you were able to compile it for your dSPACE Platform.Your dSPACE installation, and your project folder, do not contain spaces in their paths (all the paths you will use in the next steps should not contain any spaces). It is usually sufficient to copy-paste the compiler folder to a new one without spaces in it, without re-installing the whole dSPACE software suite.
Cross-compiling acados#
Step 1: Adapt the existing CMake toolchain file for your system#
The CMake toolchain file, needed to cross-compile acados for the dSPACE Platform, contains paths to compilers provided in the dSPACE installation.
As the dSPACE installation varies from system to system, this toolchain file first has to be adapted.
The toolchain files are located in <acados_root_folder>/cmake.
They are named Toolchain-dSPACE*.cmake (according to the platform IDs) and can be modified using any text editor.
The lines that contain the paths to the compilers have to be adapted to fit your system.
DS1202#
The folder name which consists of a long number (e.g., 1184D92C-D928-4591-A1E9-B54339797C20) varies. On your system in C:/ProgramData/dSPACE/, find the folder which contains the directories /Compiler/QNX650_520/host/win32/x86/ and /Compiler/QNX650_520/target/qnx6/, and update the two paths in the toolchain file.
DS1401, DS1403#
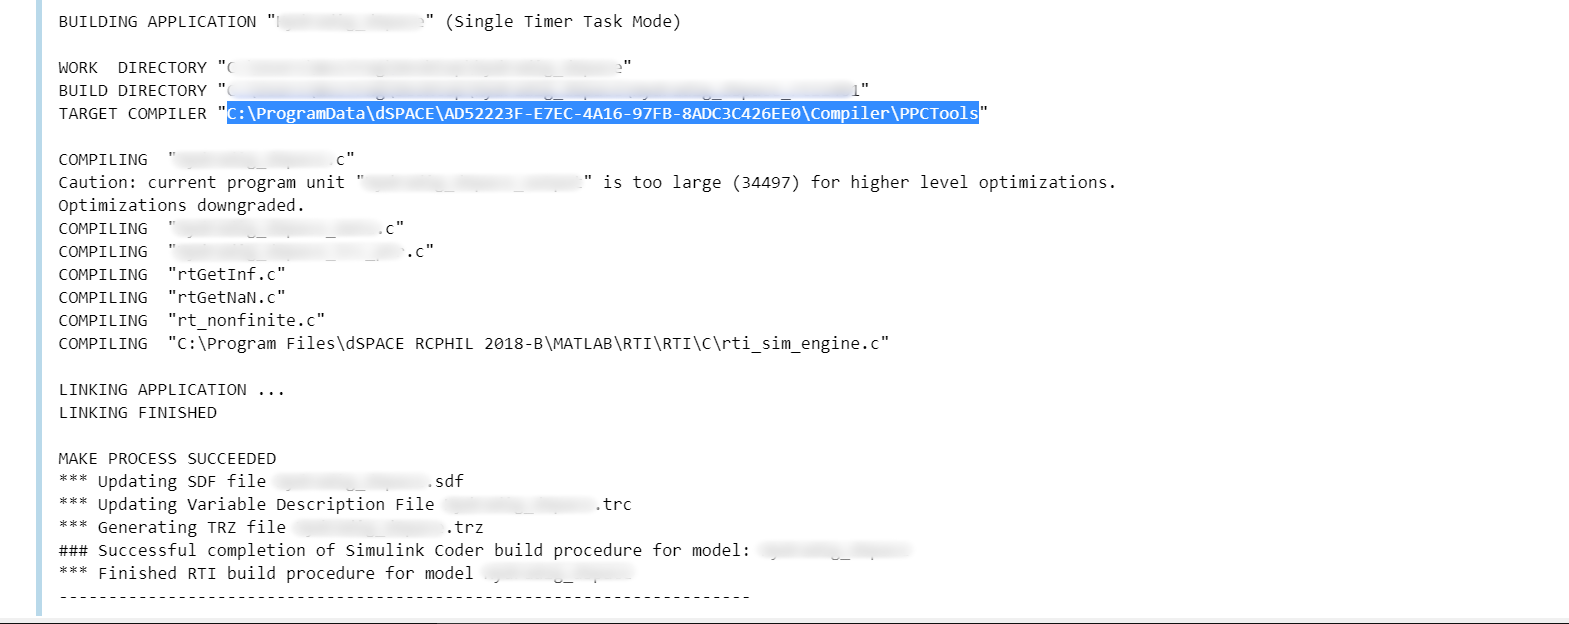
The lines that contain the paths to the compilers (lines 1 - 17) have to be adapted to fit your system.
It is possible to locate the correct compiler path from the Simulink dSPACE build output (e.g. building <dSPACE_Model_Name>.slx without acados S-Functions in it):
Depending on the compiler installed and used on your system, you may need to modify some options in the toolchain files (around line 55):
set(CMAKE_INCLUDE_FLAG_C "-J")   # for legacy compilers
set(CMAKE_INCLUDE_FLAG_CXX "-J")
For example, if using MinGW (gcc), change the option from -J to -I in the following:
set(CMAKE_INCLUDE_FLAG_C "-I")   # for gcc
set(CMAKE_INCLUDE_FLAG_CXX "-I")
Step 2: Define environment variables (required only for DS1202)#
Define an environment variable (type
envin the Windows search bar and openEdit the windows environment variables. There, clickEnvironment Variables...and create a new entry for your user with the nameQNX_HOSTand as the value, enter the path you set in the toolchain file earlier.Define an environment variable with the name
QNX_TARGETand as the value, enter the path you set in the toolchain file earlier.
Step 3: Cross-compile acados for your dSPACE platform#
In order to compile acados for your dSPACE platform, you need the acados libraries and header files in the correct format.
These files can be created by cross-compiling the acados source code for the corresponding dSPACE platform.
Using a toolchain CMake file, the following steps are needed in order to create the necessary files:
Similar to the
acadosinstallation process, create a new folderbuildDSXXXXin theacadosroot folder.In your PowerShell, navigate to this folder and then run (make sure to replace
Toolchain-dSPACEDSXXXXwith your platforms toolchain name):cmake -D CMAKE_TOOLCHAIN_FILE=../cmake/Toolchain-dSPACEDSXXXX.cmake -G "Unix Makefiles" -D CMAKE_POLICY_VERSION_MINIMUM=3.5 -S ../ -B ./In order to cross-compile
acados, run:cmake --build ./In order to install the cross-compiled
acadosversion, run:cmake --install ./
If all these steps worked, you will find the two folders, lib and include, in buildDSXXXX/install.
These are the folders you need to deploy acados on your dSPACE platform.
Deploying Simulink models#
In this chapter two methods are given for the preparation of your Simulink model.
It is generally recommended to use the first method.
Modifying Simulink Configuration Parameters#
This has been successfully tested on DS1202 MicroLabBox I in MATLAB / Simulink R2020b, on the DS1401 MicroAutobox-II (MABX2) and the DS1403 MicroAutobox-III (MABX3) in MATLAB / Simulink R2018b.
Step 1: Include the relevant files#
Add
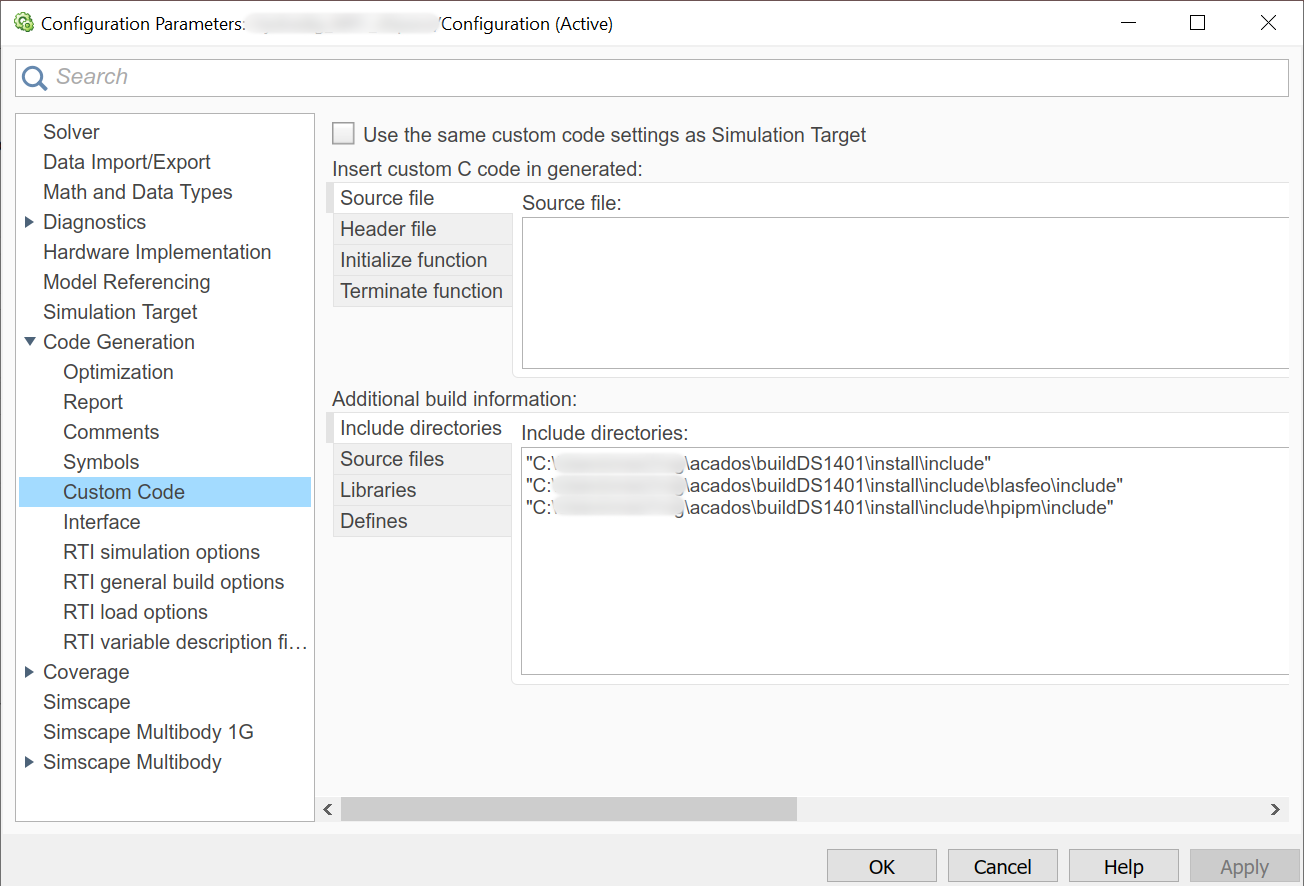
c_generated_codefolder to the MATLAB path.Open Simulink model configuration parameters (Ctrl + E), and under Code Generation / Custom Code / Additional build info, add the following paths:
Include directories: all the include directories in the
buildDSXXXX/install/includefolder as in this example:
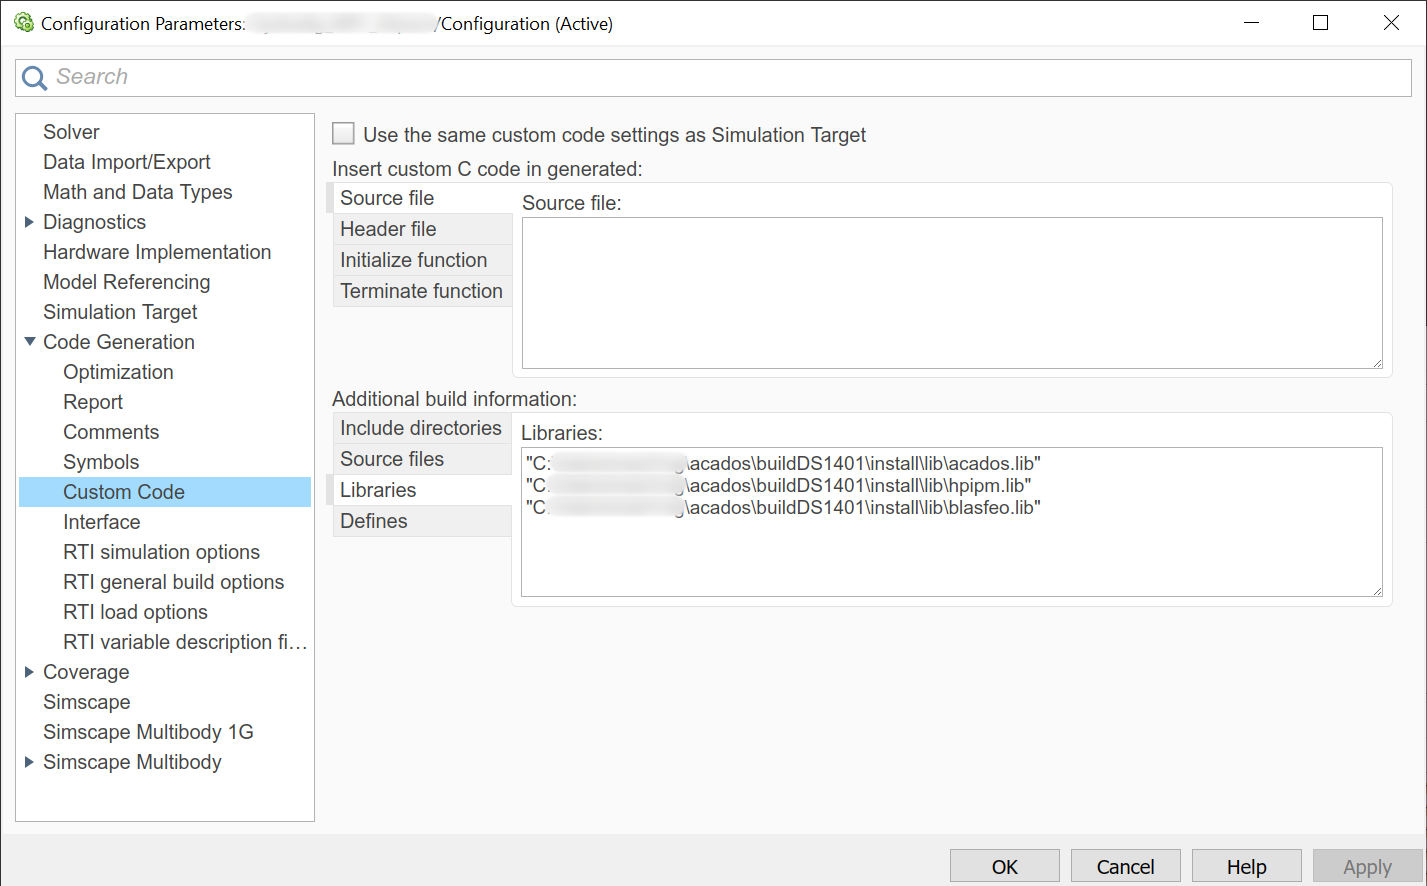
Libraries: all acados
*.aor*.libfiles in thebuildDSXXXX/install/libfolder as in this example:
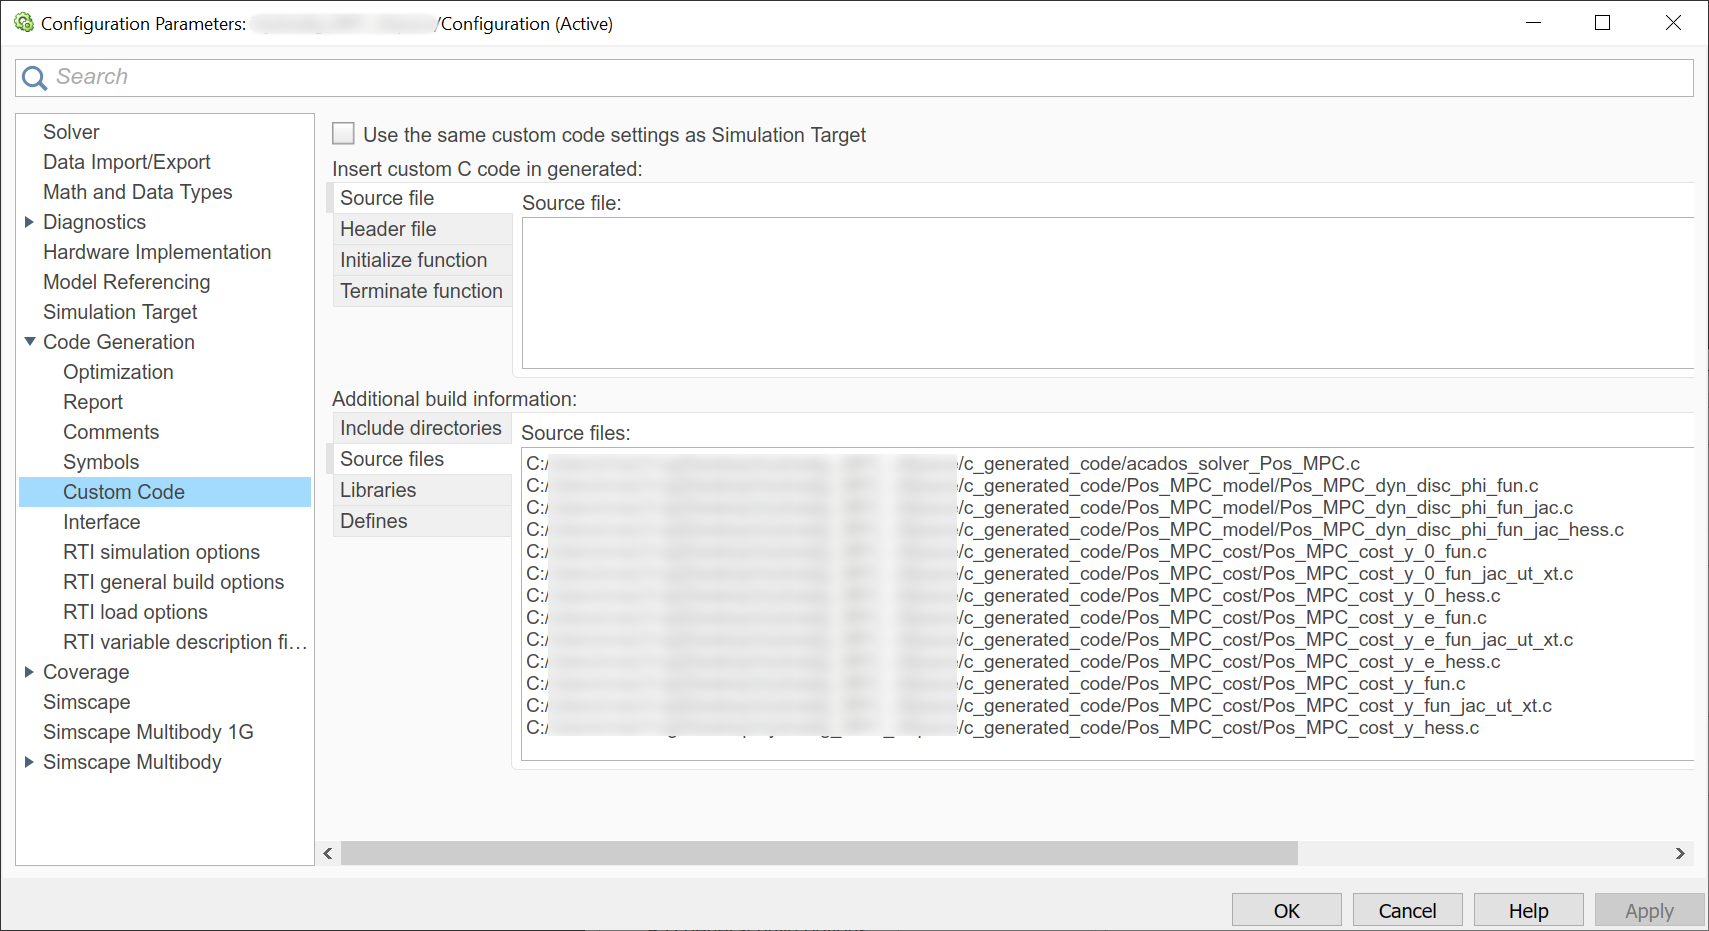
Source files: A subset of
*.cfiles in yourc_generated_codefolder, as in the example image below.Files to be included:
acados_solver_*.c,acados_sim_solver_*.c(if using the acados integrator objectAcadosSim()) and any other*.cfiles in\c_generated_code\*_cost,\c_generated_code\*_constraintsand\c_generated_code\*_modelif they exist.Files to be excluded:
acados_mex_*.c,*_main_*.c,*_sfunction_*.c,CMakeCCompilerId.cNote that these files may change based on the selected
acadosOCP options.
HINT:
It is possible to obtain a newline separated list of all required the*.cfiles by running the following PowerShell command in thec_generated_codefolder:
(Get-ChildItem -Recurse -Filter *.c | Where-Object { $_.FullName -notmatch "mex|sfunction|main|CMakeCCompilerId" } | ForEach-Object { $_.FullName -replace '/', '\' })
NOTE: if you want a space separated list of files, add-join ' 'to the end of the previous command.
NOTE: it is also possible to use only the relative paths from inside the c_generated_code folder, e.g.: c_generated_code\*_cost\*_cost_y_fun.c. However, make sure that all subfolders in c_generated_code are also added to the MATLAB path.
Step 2: Build the Simulink model#
Build the dSPACE Simulink model as usual, pressing Ctrl+B in Simulink or by using commands such as rtwbuild or rti_build2.
HINT:
Alternatively, you can use the following code in a*.mfunction to automatically build the dSPACE model in a specificbuildDSPACEfolder, here therti_build2function is used as an example.
This way you can also define any static parameters used within your model (e.g., sample time)% buildDSPACE.m clear; clc; Ts = 1e-3; var1 = 1; var2 = 2; buildDir = './buildDSPACE'; if(~isfolder(buildDir)) mkdir(buildDir); end cd(buildDir); [errorFlag, errorMsg] = rti_build2('dSPACE_Model_Name', 'Command', 'CM'); cd('../');
Modifying the dSPACE Makefile#
This alternative method has been successfully tested on the DS1202 MicroLabBox I.
Prerequisites#
Locate the dSPACE Makefile <dSPACE_Model_Name>_usr.mk, generated during compilation of the dSPACE Simulink model without the acados S-functions. It should be in the same directory as the dSPACE Simulink model.
Step 1: Create a dSPACE build folder#
Create a new folder
<dSPACE_Build_Folder_Name>(anywhere) and copy your Simulink model<dSPACE_Model_Name>.slx, the dSPACE Makefile<dSPACE_Model_Name>_usr.mkand theacadosS-Function folderc_generated_codeto this folder.Copy the two folders
libandinclude, which you created in the cross-compiling process to this folder too.
Step 2: Prepare the Simulink model#
Add the folders
c_generated_codeandlibto the MATLAB search path.Open the Simulink model
<dSPACE_Model_Name>.slx, and copy theacadosS-Function(s) from the Simulink simulation file<Simulation_Model_Name>.slxinto the dSPACE Simulink model.
Make sure the S-Function(s) get the correct inputs (Ctrl+D to check).
Step 3: Adapt the dSPACE Makefile#
Adapt the dSPACE Makefile in order to include the acados headers, libraries and additional C code source files (the same file exclusion rules apply as in the first method).
Your
acadosS-Function(s) is based on C code source files. These files are listed asSOURCESin the MATLAB scriptmake_sfun.m(andmake_sfun_sim.mif the simulation S-Function is used too). Open the dSPACE Makefile<dSPACE_Model_Name>_usr.mkand list all source files needed for the S-Functions, except for the ones which have the same name as the S-Functions.Example:
If the sources listed in
make_sfun.m(solver S-Function name: acados_solver_sfunction_OCPModelName) read as:SOURCES = [ ... 'OCPModelName_model/OCPModelName_expl_ode_fun.c ', ... 'OCPModelName_model/OCPModelName_expl_vde_forw.c ',... 'acados_solver_sfunction_OCPModelName.c ', ... 'acados_solver_OCPModelName.c ' ];
and the Sources listed in
make_sfun_sim.m(sim S-Function name: acados_sim_solver_sfunction_OCPModelName) are:SOURCES = [ 'acados_sim_solver_sfunction_OCPModelName.c ', ... 'acados_sim_solver_OCPModelName.c ', ... 'OCPModelName_model/OCPModelName_expl_ode_fun.c ', ... 'OCPModelName_model/OCPModelName_expl_vde_forw.c ',... ];
The entry in the dSPACE Makefile should read as:
# Additional C source files to be compiled (file name extension .c).
USER_SRCS =  \
OCPModelName_expl_ode_fun.c \
OCPModelName_expl_vde_forw.c \
acados_solver_OCPModelName.c \
acados_sim_solver_OCPModelName.c
Define the (relative) paths to the S-Functions and the C code source files in the dSPACE Makefile. These are the folder
c_generated_codeand any subfolder which contains C code source files, which were identified in the previous step. For the example in the previous step, the entry in the dSPACE Makefile would look like this:# Directories where S-Function C source files are stored. SFCN_DIR = \ "\c_generated_code" \ "\c_generated_code\OCPModelName_model"
Define the (relative) paths to the
acadosheader files in the dSPACE Makefile. With HPIPM as the QP solver, this looks as follows:# Path names for user include files. USER_INCLUDES_PATH = \ "include" \ "include\blasfeo\include" \ "include\hpipm\include"
Define the libraries needed to compile the S-Functions. With HPIPM as the QP solver, this looks as follows:
# Additional user libraries to be linked.
# NOTE: these might be *.lib for other systems
USER_LIBS = \
lib\libblasfeo.a \
lib\libhpipm.a \
lib\libacados.a
Save the dSPACE Makefile.
Step 4: Compile your dSPACE Simulink model for dSPACE#
In order to compile your dSPACE Simulink model <dSPACE_Model_Name>.slx, use the rtwbuild command in MATLAB or press Ctrl+B in Simulink.
The Makefile should now integrate all the necessary files for the compilation of the acados S-Functions.
STM32 microcontrollers#
A workflow for prototyping and deploying an acados-based NMPC controller on an STM32 board is showcased in the acados-STM32-NUCLEO-H745ZI repository.
This workflow generates the problem specific code from MATLAB, which could similarly be done from Python.
To deploy the controller a project is created using the STM32CubeIDE.
Therein a list of required .c and .h files of the acados, BLASEO and HPIPM source code are defined to be compiled for the target.
The workflow is tested using an STM32 NUCLEO H745ZIQ board.
The workflow is expected to work with minimal adaptations for similar boards.